Guides
How to Add Background Music to a Video the Right Way
- Written by
- Sonilo Team
- Published
I've watched a lot of otherwise solid videos tank because of the music. Not because the track was bad — it was usually fine — but because whoever added it just dropped it in at full volume and called it done. The voice ends up fighting the music. The edit feels louder than it should. And the viewer tunes out before the first minute is over.
Adding background music correctly is less about finding the right song and more about mixing it so it stays in the background. This article covers exactly that: volume levels, ducking, timing, fades, and the specific things that trip people up every time.
What "Background Music" Actually Means in a Video Edit
Here's something that confused me when I was starting out: background music isn't just music that plays while something else is happening. It's music that's been mixed to stay underneath everything else — voice, sound effects, ambient audio — without pulling attention toward itself.
The goal is presence without intrusion. You want viewers to feel the emotional tone of the track without consciously noticing it's there. When background music is done right, people don't comment on the music. They comment on how the video feels.
That distinction matters because it changes how you approach every decision below — volume, ducking, timing, fades. All of it is in service of one thing: making the music do its job without announcing itself.
Step 1 — Pick the Track That Fits
Before anything else, the track needs to actually match the video. Not just in genre — in pacing, energy, and emotional arc.
I know this sounds obvious. But I've seen people pick a great song and then spend forty minutes trying to make the mix work, when the real problem was that the track's energy was wrong for the footage. An upbeat, busy track under a calm interview is going to fight you at every step of the mixing process.
A few things I check before I commit to a track:
- Tempo vs. cut rhythm — does the beat land roughly where the cuts land, or does it feel like two separate things playing at the same time?
- Instrumentation density — a track with constant movement (busy bass, drums, melodic layers) is harder to push into the background than something with space in it
- Emotional match — if the video is reflective and the music is celebratory, no amount of EQ fixes that
Once the track fits, adding it correctly becomes a lot easier. If you're still at the selection stage, there's more on matching music mood to video content that's worth reading first.
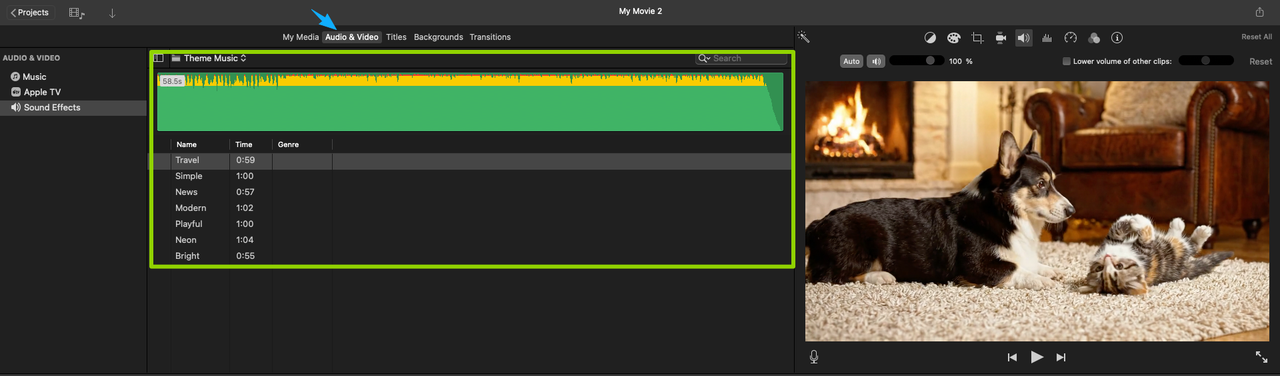
Step 2 — Set the Right Volume Level
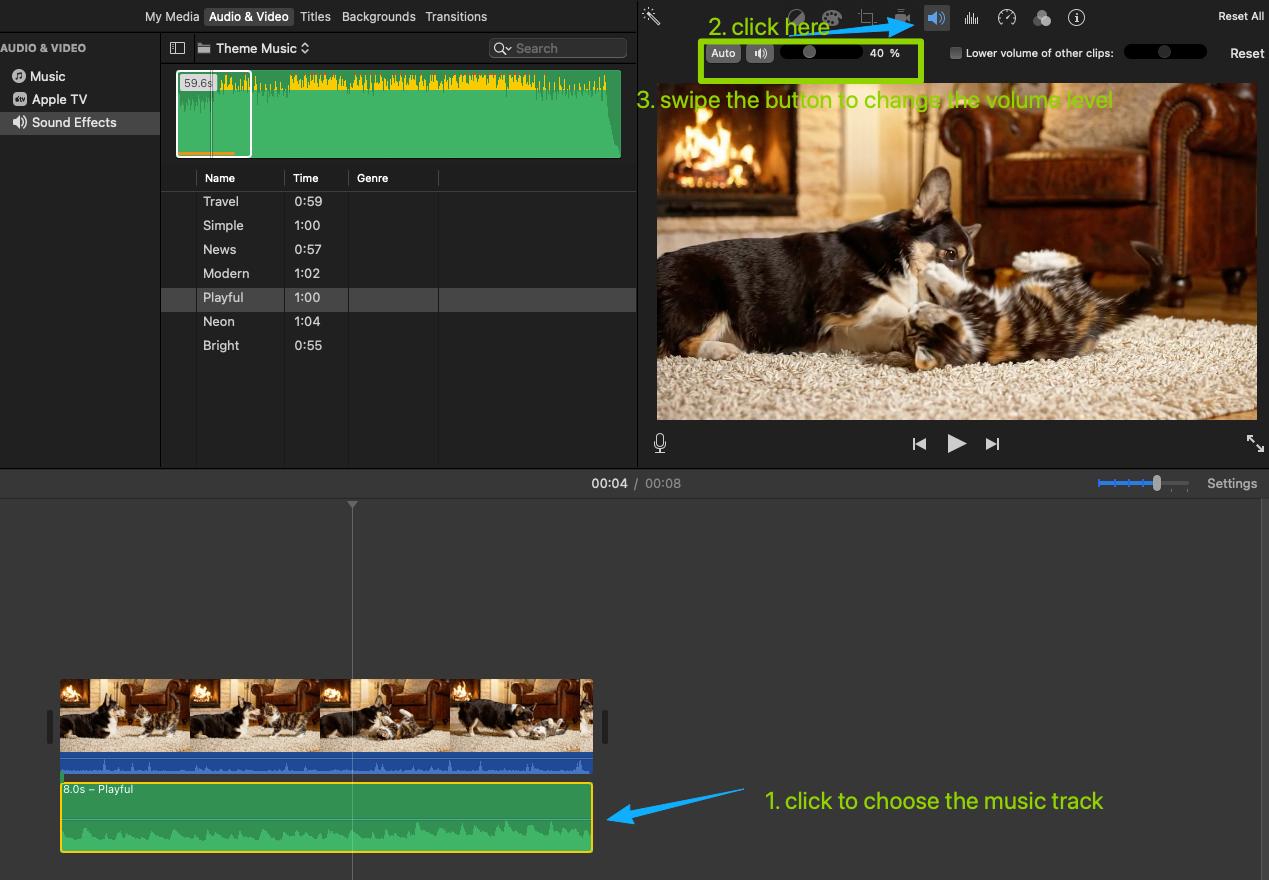
This is where most problems start. People either go too quiet (music disappears entirely) or too loud (music competes with everything else).
Typical dB Ranges for Background Music
For reference, these are the general ranges I work with:
| Context | Music level (relative to voice) |
|---|---|
| Voice-led content (interview, tutorial, vlog) | –12 to –18 dB below voice |
| Music-forward (montage, B-roll only) | –3 to –6 dB below reference |
| Intro / outro (no voice) | Full volume or –3 dB |
What those numbers mean in practice: if your voice peaks around –6 dBFS, background music should be sitting somewhere around –18 to –24 dBFS during dialogue. That feels way quieter than you'd expect on the timeline. But on playback, it's usually about right.
One thing that helped me stop second-guessing this: I stopped setting volume by how it looks on the waveform and started setting it by how it sounds on playback through speakers, not headphones. Headphones almost always make the music feel louder than it actually is relative to voice. What sounds balanced on headphones often sounds muddy on laptop speakers — which is where a lot of your audience will actually watch.
How to Test on Real Playback
After I've set a rough level, I do these three checks before locking it in:
- Play it back on laptop speakers at a normal listening volume
- Watch a section where someone is speaking — can you understand every word without effort?
- Watch a B-roll section — does the music feel like it's supporting the visuals, or competing with them?
If the answer to 2 is "mostly" — the music is still too loud.
Step 3 — Apply Ducking So Voice Stays Clear
Ducking is what happens when the music volume drops whenever someone speaks, then rises back up during pauses. It's one of the most useful things in a video mix, and a lot of creators don't know it exists.
What Ducking Does
Without ducking, you're stuck picking a single volume level for the music across the entire video. That level has to be low enough not to interfere with voice — which means during B-roll sections with no voice, the music feels oddly quiet.
Ducking solves this by letting the music run at a higher level when there's no voice, then pulling it down automatically when dialogue kicks in. The result sounds more natural because the music is responding to what's happening, rather than just sitting at a static level throughout.
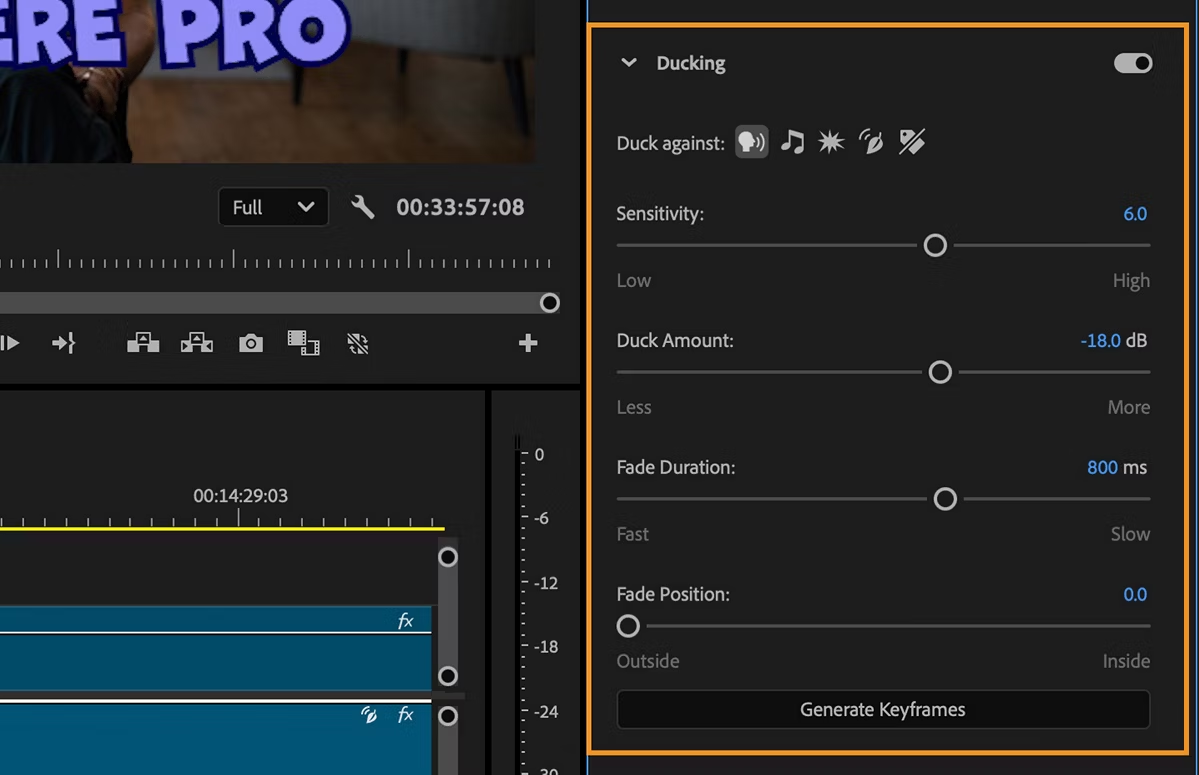
Auto-Ducking vs. Manual
Auto-ducking is built into tools like CapCut, Premiere Pro (via Essential Sound), and DaVinci Resolve. You set it up once, pick the sensitivity and duck amount, and it handles the rest. It's fast, and for most content it works fine. If you're on Premiere, Adobe's official walkthrough on how to automatically duck audio in Premiere Pro covers the exact steps in the Essential Sound panel.
Manual ducking means you're drawing the automation curves yourself — literally dropping the music volume keyframe by keyframe wherever someone speaks. It takes longer, but gives you exact control. For scripted content, ads, or anything where timing is precise, manual ducking usually produces a cleaner result.
My workflow: I use auto-ducking for a first pass, then go in manually to fix anything it got wrong — usually the transitions feel a little abrupt, or it ducks in spots where it didn't need to.
If you've never done this before and your software has an auto-duck option, start there. You'll hear the difference immediately.
Step 4 — Time the Music to Your Edit (Intro, Body, Outro)
The music doesn't have to start when the video starts. And it almost never should end when the video ends.
Here's how I typically structure it:
Intro: Music starts at full level (or near-full) before any voice appears. This sets tone and gives viewers a moment to land before the content begins. Usually 5–15 seconds of music-only.
Body: Once voice starts, music ducks. The track keeps running underneath, but at the background level you set in Step 2.
Outro: When the last line of dialogue ends, music rises back up — either to full level for a proper ending, or stays at mid-level under a CTA or end card. Fade out at the very end.
The mistake I see constantly is music that just... stops when the content stops. The video ends, cut to black, music cuts off. It feels abrupt because it is. Even a two-second fade-out makes the ending feel intentional rather than accidental.
Step 5 — Add Fade-In / Fade-Out Transitions
Fades are what make music feel like it belongs to the video rather than being dropped on top of it.
Fade-in: At the start of a track, a 1–3 second fade-in softens the entry. Even if the music starts loud (for an energetic intro), a very short fade of 0.5 seconds removes the abrupt start. No one ever complained about a track fading in. Plenty of people notice when it doesn't.
Fade-out: At the end, fade length depends on what you want the ending to feel like. Energetic content that cuts to black can use a faster fade (1–2 seconds). Reflective or slower content usually benefits from a longer tail (3–5 seconds). Test it.
Mid-video transitions: If you're switching tracks partway through — say, from a calmer section to a more energetic one — overlap the two tracks and crossfade over 2–4 seconds. Direct cuts between tracks almost always sound jarring.
One thing worth knowing: fades that feel right on headphones often feel too fast on speakers. Add a second to whatever you think sounds right, then check on speakers.
Step 6 — Loop or Trim to Match Exact Video Length
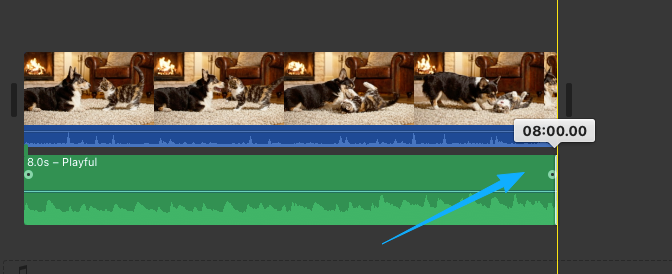
This is the part that eats time. Your video is 3 minutes 47 seconds. Your track is 2 minutes 30. What do you do?
Option 1 — Trim the track. Find a natural loop point (usually a section with minimal instrumentation — a breakdown, a verse repeat) and cut there. Crossfade over the edit point to hide the cut. Messy tracks with lots of movement are hard to loop cleanly; sparse tracks are easy.
Option 2 — Use a shorter track. Let the music run for its full length and end before the video does, with a fade-out. Works well if the remaining section is mostly dialogue and doesn't need music support.
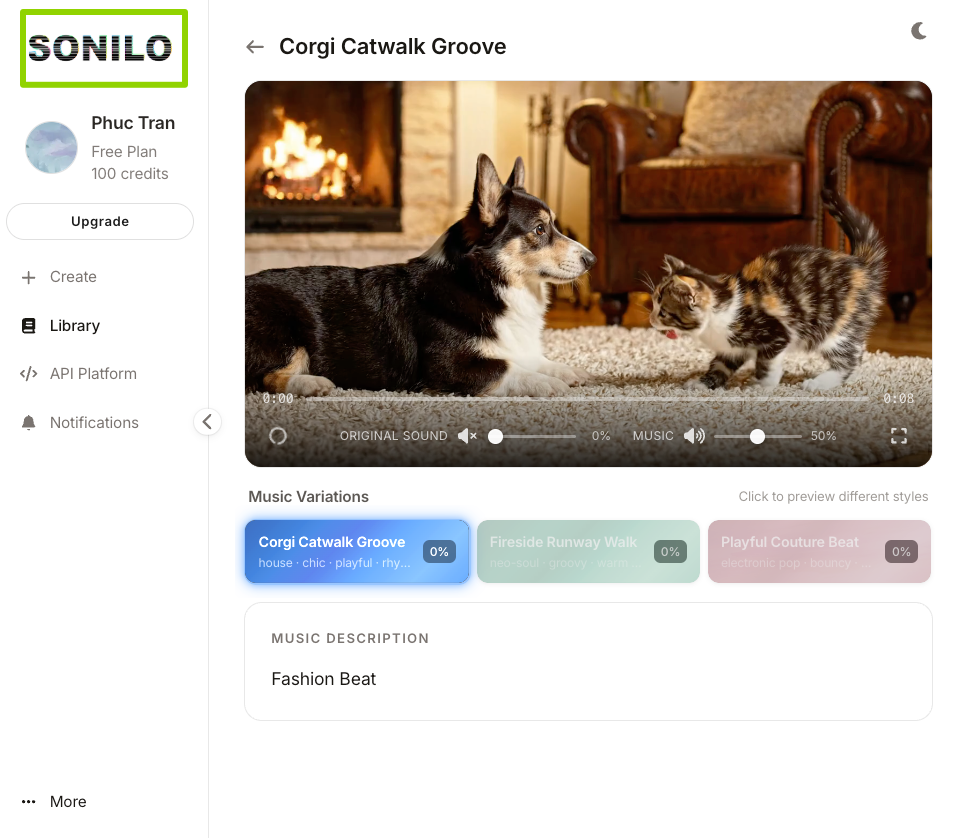
Option 3 — Use a tool that generates music to match your video length. This is where something like Sonilo comes in — it generates a soundtrack that's already built to your video's exact duration, which sidesteps the looping problem entirely. Worth testing if you find yourself doing this manually every single project.
For everything else, Option 1 is what I do most often. Finding the loop point takes practice, but once you've done it a few times, it gets faster.
Choosing Music vs. Adding Music — The Order Matters
Here's something I got backwards for a long time: I'd finish editing, then go looking for music to add. That sounds logical, but it creates a specific problem — you're selecting a track after the edit is locked, which means the music has to work around decisions you already made.
The better sequence, when you can manage it:
- Rough cut with placeholder music (or no music)
- Select your actual track based on the rough cut
- Fine-tune the edit with the real track in place
This matters most for pacing. When you're cutting to music — even loosely — the edit tends to breathe better. Cuts land in more natural places. The rhythm of the video and the rhythm of the music end up aligned rather than fighting each other.
You don't always have this option. Client deadlines, platform schedules, and last-minute content don't allow for it. But if you're building a workflow from scratch, this order produces noticeably better results.
Common Mistakes
A few things I see constantly — and still occasionally do myself:
Setting volume on headphones only. I mentioned this earlier, but it's worth repeating. Always check on speakers before you lock.
Using a track that's too rhythmically busy. Dense tracks with constant movement are almost impossible to mix into a true background. When in doubt, pick something with space in it.
Not ducking at all. A flat music level through an entire talking-head video is one of the most reliable ways to make it feel amateurish. Even manual ducking — a few keyframes per section — is better than nothing.
Forgetting to fade out. The video ends, the music cuts. Every time.
Looping in an obvious spot. Listeners pick up on loops faster than you'd expect, especially in shorter tracks. The loop point needs to be somewhere the instrumentation is minimal and the edit is invisible.
FAQ
Q1: How loud should background music be compared to voice?
As a starting point: background music should sit 12 to 18 dB below your voice during dialogue sections. If your voice peaks around –6 dBFS, that puts the music at roughly –18 to –24 dBFS. It will feel quieter than you expect on the timeline — that's normal. Test on speakers before making any adjustments.
Q2: What is audio ducking and why does it matter for background music?
Ducking is a mixing technique where the music volume automatically lowers when voice is present, then rises back up during non-speaking sections. It matters because it lets you use a higher music level throughout the video (so it's audible during B-roll) without burying your dialogue. Most editing tools have an auto-ducking feature built in — it's worth turning on even for a first pass.
Q3: Should background music start at the beginning of the video?
Not necessarily. A lot of creators let music start 2–5 seconds before the first spoken word — this gives the audience time to land in the emotional tone before content begins. What you want to avoid is music starting exactly when speech starts; that tends to feel like they're competing rather than working together.
Q4: How do I make background music fade in and out smoothly?
In most editing software, you can add keyframes to the audio clip's volume automation — drop one at the start of the fade, one at the end, and set the levels. Fade-in for background music: 1–3 seconds. Fade-out at the end: 2–5 seconds depending on the ending tone. For crossfades between two tracks, 2–4 second overlaps usually sound clean.
Q5: Can I use the same background track for multiple videos?
Yes — with caveats. If your content has a consistent tone, using the same track or tracks builds audio brand identity. The issue is audience recognition: regular viewers will start noticing the repetition, which can undermine the "presence without intrusion" goal. Rotating between 3–5 tracks with a similar feel is a good middle ground.
Q6: What's the difference between background music and a soundtrack?
Background music typically refers to a track mixed low to support content — it's in the mix, not the foreground. A soundtrack more often refers to music designed specifically for a video, where the music and visuals are meant to work together as a unified piece. In practice the terms get used interchangeably, but the distinction matters for how you'd approach the mixing.
Q7: How do I match background music length to my video?
Three ways: trim and loop the track at a natural edit point (a breakdown or verse repeat), fade the track out before the video ends, or use a tool that generates music to your exact video length. If you find yourself manually looping tracks on every project, that last option is worth looking into — it removes one of the more tedious steps in the process.
Q8: What should creators check before publishing a video with background music?
A few things worth verifying before you hit publish:
- Volume check on speakers — not just headphones
- Voice intelligibility — play a speaking section; can you understand every word without concentrating?
- License terms — wherever the music came from, check what it allows: commercial use, platform distribution, client work. The license page is worth reading yourself; I'm not the right person to interpret it for your specific situation, but it's the kind of thing that matters more than people expect it to
- Platform compatibility — if you're uploading to YouTube, be aware that YouTube's policy on claimed music makes clear that copyright holders control how their tracks are used — your video can be muted, blocked, or monetized on their behalf without notice. The one place I'd actually trust is YouTube's Audio Library — YouTube's own help page describes it as the only music they know to be copyright-safe. Worth reading that page yourself to understand what that actually covers

- Fade check — play the last 10 seconds and make sure the ending actually fades rather than cutting off
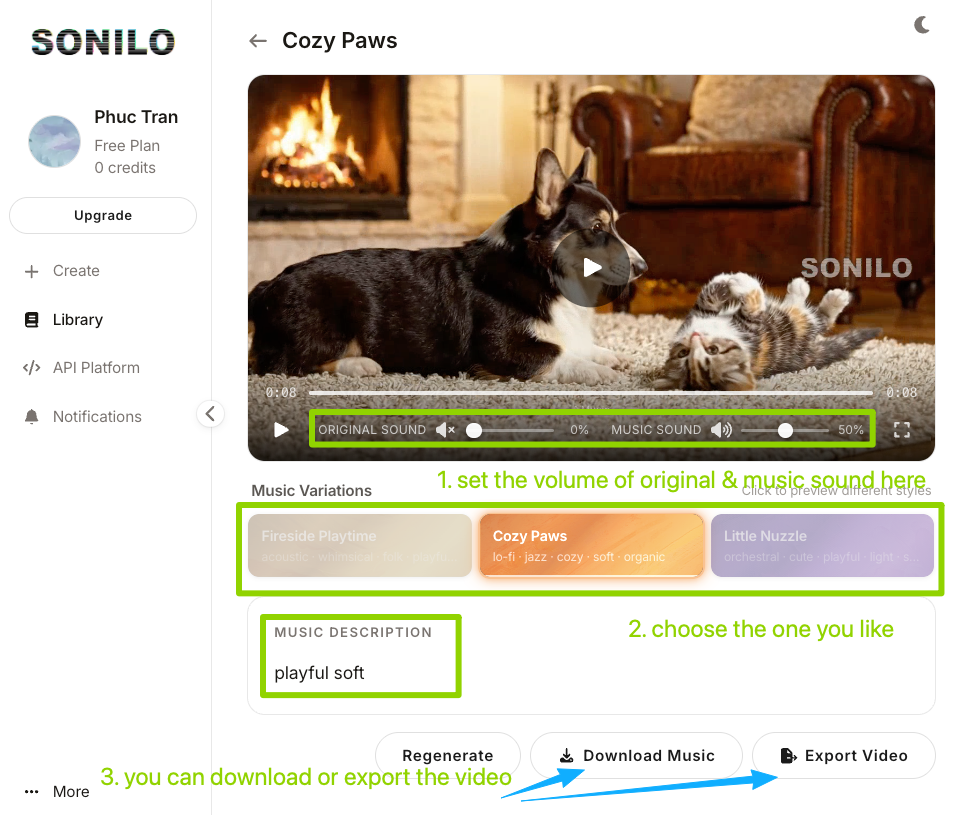
If you're still at the music-selection stage and haven't locked a track yet, Sonilo generates a soundtrack built to your video's exact length and mood — which means less time on the looping and trimming steps above. Worth a look before you go down the manual adjustment path.
What's the part that slows you down most — getting the ducking right, matching the length, or something else entirely? Genuinely curious where people get stuck, because it's different for almost every workflow.